Dump Oracle Database to Sql File
16/18
10 Exporting and Importing Metadata and Data
This chapter describes how to export (unload) from and import (load) into Oracle Database XE. You can export and import metadata (database object definitions), data, or both metadata and data. It contains the following topics:
Data can be exported for later importing (loading) into another Oracle database or into a non-Oracle database. Data that has been unloaded from a non-Oracle database can be loaded into an Oracle database, if the data is in a suitable format for loading.
This chapter includes the following topics:
-
Using SQL Developer for Exporting and Importing
-
Using Other Tools for Exporting and Importing Data
For convenience and the range of features available, you may want to use SQL Developer for export and import operations unless you need to use another tool (command-line utility).
Using SQL Developer for Exporting and Importing
SQL Developer provides convenient wizards for exporting and importing metadata and data:
-
To export metadata or data, or both, use the Export Wizard: click Tools, then Database Export.
-
To import metadata or data, or both, use an appropriate method depending on how the material to be imported was created, or the format of the data to be imported. This method might be running a script file, or using the Data Import Wizard to import from a data file (such as a .csv file or a Microsoft Excel .xls file).
See the following examples of using SQL Developer for performing export and import operations:
-
Example: Exporting Metadata and Data for a Table
-
Example: Importing Metadata and Data Using a Script File
-
Example: Exporting Data to a Microsoft Excel File
-
Example: Importing Data from a Microsoft Excel File
Example: Exporting Metadata and Data for a Table
Assume that you want to export the REGIONS table, which is part of the HR sample schema, so that it can be created, along with its data, in another schema (either in the same Oracle database or another Oracle database).
To unload the REGIONS table:
-
In SQL Developer, click Tools, then Database Export. Figure 10-1 shows the first page of the Export Wizard, but with entries reflecting selections that you will make.
-
Accept the default values for the Source/Destination page options, except as follows:
Connection: Select
HR.Show Schema: Deselect (uncheck) this option, so that the
HRschema name is not included in CREATE and INSERT statements in the .sql script file that will be created. (This enables you to re-create the table in a schema with any name, such as one not named HR.)Save As location: Enter or browse to a desired folder on your local hard drive, and specify the file name for the script file. (In the figure, this file is
C:\temp\export.sql.) The script file containing CREATE and INSERT statements will be created in this location.Note:
For explanations of the options on this or any other wizard page, click the Help button.
For example, Format has other possible values besides the default
insert, which causes SQLINSERTstatements to be included to insert the data. Other values includeloaderto cause SQL*Loader files to be created, andxlsto cause a Microsoft Excel .xls file to be created. -
Click Next.
-
On the Types to Export page, deselect Toggle All, then select only Tables (because you only want to export a table).
-
Click Next.
-
On the Specify Objects page, click Lookup, then double-click the
REGIONStable on the left to move it to the right-hand column. Figure 10-2 shows the result of these actions. -
Click Next.
-
On the Specify Data page, accept the defaults and click Next.
By default, all data from the specified table or tables is exported; however, if you want to limit the data to be exported, you can specify one or more "
WHEREclauses" in the bottom part of this page. -
On the Summary page, review the information; and if it is what you want, click Finish. (Given what you specified, this causes the export script to be created as
C:\temp\export.sql.)If you need to make any changes, go back to the appropriate page or pages and make them, and then move forward to the Summary page again.
Example: Importing Metadata and Data Using a Script File
Assume that you wanted to re-create the REGIONS table that you exported in "Example: Exporting Metadata and Data for a Table", but in a different schema. This other schema can be an existing one or one that you create.
For example, assume that you created a user named NICK following the instructions in "Example: Creating a User". To re-create the REGIONS table in the schema of user NICK by invoking the script in C:\temp\export.sql follow these steps using SQL Developer:
-
If you have not already created a database connection for
NICK, create the connection. -
Open the
NICKconnection. -
In the SQL Worksheet for the
NICKconnection, type the following:@c:\temp\export.sql
-
Click the Run Script icon.
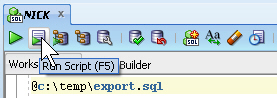
The Script Output pane shows that the
REGIONStable has been created and four rows have been inserted. -
In the Connections navigator, expand the Tables node under the
NICKconnection. You now see theREGIONStable. -
Optionally, click the
REGIONStable in the Connections navigator, and examine the information under the Columns and Data tabs in the main display area.
Example: Exporting Data to a Microsoft Excel File
Assume that you want to export only the data from the REGIONS table, which is part of the HR sample schema, so that the data can be imported into a table with the same column definitions. This might be a REGIONS table in another schema (either in the same Oracle database or another Oracle database).
You use the same Database Export wizard, but export only the data, and not the DDL (Data Definition Language statements for creating database objects).
To export the data the REGIONS table:
-
In SQL Developer, click Tools, then Database Export. Figure 10-3 shows the first page of the Export Wizard, but with entries reflecting selections that you will make.
-
Accept the default values for the Source/Destination page options, except as follows:
Connection: Select
HR.Export DDL: Deselect (uncheck) this option. If a .sql script file is generated (which will not happen in this example), it will not contain any
CREATEstatements, but onlyINSERTstatements.Format: Select xls to have the data saved to a Microsoft Excel .xls file.
Save As location: Enter or browse to a desired folder on your local hard drive, and specify the file name for the .xls file. (In the figure, this file is
C:\temp\export.xls.) -
Click Next.
-
On the Types to Export page, deselect Toggle All, then select only Tables (because you only want to export data for a table).
-
Click Next.
-
On the Specify Objects page, click Lookup, then double-click the
REGIONStable on the left to have it appear in a row in the bottom part of the page. Figure 10-2 shows the result of these actions.By default, all data from the specified table or tables is exported; however, if you want to limit the data to be exported, you can specify one or more "
WHEREclauses" in the bottom part of this page. -
Click Next.
-
On the Summary page, review the information; and if it is what you want, click Finish. (Given what you specified, this causes the data in the
REGIONStable to be exported to the fileC:\temp\export.xls.)If you need to make any changes, go back to the appropriate page or pages and make them, and then move forward to the Summary page again.
Example: Importing Data from a Microsoft Excel File
Assume that you wanted to import the data that was exported in "Example: Exporting Data to a Microsoft Excel File", into a new table that has the same column definitions as the original (REGIONS) table.
For example, assume that you created a user named NICK following the instructions in "Example: Creating a User". This user wants to take the exported data, add one row in the Excel file, and import it into a new table that has the same column definitions as the REGIONS table. (This example is trivial, and adding a row to the Excel file may not be typical, but it is presented merely to illustrate some capabilities.)
To accomplish these goals, follow these steps:
-
In SQL Developer, if you have not already created a database connection for
NICK, create the connection. -
Open the
NICKconnection. -
In the SQL Worksheet for the
NICKconnection, type the following:create table new_regions ( region_id number primary key, region_name varchar2(25));
-
Click the Run Script icon.
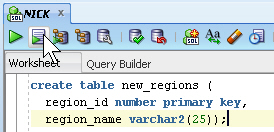
The Script Output pane shows that the
NEW_REGIONStable has been created. -
In the Connections navigator, expand the Tables node under the
NICKconnection. You now see theNEW_REGIONStable.If you do not see the
NEW_REGIONStable, disconnect fromNICK(right-clickNICKin the Connections navigator and select Disconnect) and connect again, and expand the Tables node. -
Using Microsoft Excel, open the file containing the exported data (for example, c:\temp\export.xls), and optionally add one or more rows.
Figure 10-5 shows the original file with one row added for the Antarctica region.
-
Save and close the Microsoft Excel .xls file.
-
In SQL Developer, in the Connections navigator display for
NICK, right-lick the NEW_REGIONS table and select Import Data. -
In the dialog box that is displayed, navigate to the
c:\tempfolder, selectexport.xls, and click Open. -
In the Data Import Wizard, accept all the defaults; click Next on each page until Summary, and click Finish there. (For information about the options on any wizard page, click the Help button.)
The data from the
.xlsfile is loaded into theNEW_REGIONStable and is committed.
Using Other Tools for Exporting and Importing Data
If the SQL Developer export and import wizards are not satisfactory for your needs, you can use one of the command-line utilities available with Oracle Database XE. These other tools are described in the following sections:
-
Choosing the Right Export/Import Utility
-
Loading Data with SQL*Loader
-
Exporting and Importing Data
Choosing the Right Export/Import Utility
Oracle Database XE provides a number of powerful utilities for exporting and importing data. Table 10-1 provides a summary of these options.
Table 10-1 Summary of Other Export/Import Data Options
| Feature or Utility | Description |
|---|---|
| SQL*Loader utility |
|
| Data Pump Export and Data Pump Import utilities |
|
| Export and Import utilities |
|
Table 10-2 provides a number of load/unload/import/export scenarios and suggests the appropriate option to use for each.
Table 10-2 Import/Export Scenarios and Recommended Options
| Import/Export Scenario | Recommended Option |
|---|---|
| You have to load data that is not delimited. The records are fixed length, and field definitions depend on column positions. | SQL*Loader |
| You have tab-delimited text data to load, and there are more than 10 tables. | SQL*Loader |
| You have text data to load, and you want to load only records that meet certain selection criteria (for example, only records for employees in department number 3001). | SQL*Loader |
| You want to import or export an entire schema from or to another Oracle database. There is no XMLType data in any of the data. | Data Pump Export and Data Pump Import |
| You want to import or export data from or to another Oracle database. The data contains XMLType data and contains no | Import ( |
Loading Data with SQL*Loader
SQL*Loader loads data from external datafiles into tables of an Oracle database. A particular datafile can be in fixed record format, variable record format, or stream record format (the default).
The input for a typical SQL*Loader session is a control file, which controls the behavior of SQL*Loader, and some data, located either at the end of the control file itself, or in a separate datafile.
The output of a SQL*Loader session is an Oracle database (where the data is loaded), a log file, a "bad" file, and potentially, a discard file. The log file contains a detailed summary of the load, including a description of any errors that occurred during the load. The bad file contains records that were rejected, either by SQL*Loader or by the Oracle database. The discard file contains records that were filtered out of the load because they did not match any record-selection criteria specified in the control file.
Methods SQL*Loader Uses to Load Data
SQL*Loader uses three different methods to load data, depending on the situation: conventional path, direct path, and external tables.
Conventional Path
A conventional path load is the default loading method. It executes SQL INSERT statements to populate tables in an Oracle database. This method can sometimes be slower than other methods because extra overhead is added as SQL statements are generated, passed to Oracle, and executed. It can also be slower because when SQL*Loader performs a conventional path load, it competes equally with all other processes for buffer resources.
Direct Path
A direct path load does not compete with other users for database resources. It eliminates much of the Oracle database overhead by formatting Oracle data blocks and writing them directly to the database files, bypassing much of the data processing that normally takes place. Therefore, a direct path load can usually load data faster than conventional path. However, there are several restrictions on direct path loads that may require you to use a conventional path load. For example, direct path load cannot be used on clustered tables or on tables for which there are transactions pending.
See Oracle Database Utilities for a complete discussion of situations in which direct path load should and should not be used.
External Tables
An external table load creates an external table for data that is contained in a datafile. The load executes INSERT statements to insert the data from the datafile into the target table. An external table load allows modification of the data being loaded by using SQL functions and PL/SQL functions as part of the INSERT statement that is used to create the external table.
See Oracle Database Administrator's Guide for more information on external tables.
SQL*Loader Features
You can use SQL*Loader to do the following:
-
Load data across a network. This means that you can run the SQL*Loader client on a different system from the one that is running the SQL*Loader server.
-
Load data from multiple data files during the same load session.
-
Load data into multiple tables during the same load session.
-
Specify the character set of the data.
-
Selectively load data (you can load records based on the records' values).
-
Manipulate the data before loading it, using SQL functions.
-
Generate unique sequential key values in specified columns.
-
Use the operating system's file system to access the datafiles.
-
Load data from disk, tape, or named pipe.
-
Generate sophisticated error reports, which greatly aid troubleshooting.
-
Load arbitrarily complex object-relational data.
-
Use secondary datafiles for loading LOBs and collections.
Example: Using SQL*Loader
In the following example, a new table named dependents will be created in the HR sample schema. It will contain information about dependents of employees listed in the employees table of the HR schema. After the table is created, SQL*Loader will be used to load data about the dependents from a flat data file into the dependents table.
This example requires a data file and a SQL*Loader control file, which you will create in the first two steps.
-
Create the data file,
dependents.dat, in your current working directory. You can create this file using a variety of methods, such as a spreadsheet application or by simply typing it into a text editor. It should have the following content:100,"Susan, Susie",Kochhar,17-JUN-1997,daughter,101,NULL, 102,David,Kochhar,02-APR-1999,son,101,NULL, 104,Jill,Colmenares,10-FEB-1992,daughter,119,NULL, 106,"Victoria, Vicki",Chen,17-JUN-1997,daughter,110,NULL, 108,"Donald, Donnie",Weiss,24-OCT-1989,son,120,NULL,
This file is a CSV (comma-separated values) file in which the commas act as delimiters between the fields. The field containing the first name is enclosed in double quotation marks in cases where a variant of the official name is also provided—that is, where the first name field contains a comma.
-
Create the SQL*Loader control file,
dependents.ctl, in your current working directory. You can create this file with any text editor. It should have the following content:LOAD DATA INFILE dependents.dat INTO TABLE dependents REPLACE FIELDS TERMINATED BY ',' OPTIONALLY ENCLOSED BY '"' ( dep_id, first_name, last_name, birthdate, relation, relative_id, benefits )
-
Do one of the following:
-
On Linux: Start a terminal session and log in to the Oracle Database XE host computer with the
oracleuser account. -
On Windows: Log in to the Oracle Database XE host computer as the user who installed Oracle Database XE, and then open a command window.
-
-
On Linux, ensure that environment variables are set according to the instructions in "Setting Environment Variables on the Linux Platform".
-
Start the SQL Command Line (SQL*Plus) and connect as user
hrby entering the following at the command prompt:sqlplus hr/hr
-
At the SQL prompt, create the
dependentstable, as follows:CREATE TABLE dependents ( dep_id NUMBER(6), first_name VARCHAR2(20), last_name VARCHAR2(25) CONSTRAINT dep_last_name_nn NOT NULL, birthdate DATE, relation VARCHAR2(25), relative_id NUMBER(6) CONSTRAINT emp_dep_rel_id_fk REFERENCES employees (employee_id), benefits CLOB ) /
The constraint on the
last_namecolumn indicates that a value must be provided. The constraint on therelative_idcolumn indicates that it must match a value in theemployee_idcolumn of theemployeestable. Thebenefitscolumn has a datatype ofCLOBso that it can hold large blocks of character data. (In this example, there is not yet any benefits information available so the column is shown asNULLin the data file,dependents.dat.)After you receive the
Table createdmessage, enterexitto exit the SQL Command Line. -
From within your current working directory (where you created the control and data files), issue the following SQL*Loader command at the system prompt:
sqlldr hr/hr DATA=dependents.dat CONTROL=dependents.ctl LOG=dependents.log
The data in the
dependents.datfile is loaded into thedependentstable and the following message is displayed:Commit point reached - logical record count 5
Information about the load is written to the log file,
dependents.log. The content of the log file looks similar to the following:Control File: dependents.ctl Data File: dependents.dat Bad File: dependents.bad Discard File: none specified (Allow all discards) Number to load: ALL Number to skip: 0 Errors allowed: 50 Bind array: 64 rows, maximum of 256000 bytes Continuation: none specified Path used: Conventional Table DEPENDENTS, loaded from every logical record. Insert option in effect for this table: REPLACE Column Name Position Len Term Encl Datatype ------------------------------ ---------- ----- ---- ---- --------------------- DEP_ID FIRST * , O(") CHARACTER FIRST_NAME NEXT * , O(") CHARACTER LAST_NAME NEXT * , O(") CHARACTER BIRTHDATE NEXT * , O(") CHARACTER RELATION NEXT * , O(") CHARACTER RELATIVE_ID NEXT * , O(") CHARACTER BENEFITS NEXT * , O(") CHARACTER Table DEPENDENTS: 5 Rows successfully loaded. 0 Rows not loaded due to data errors. 0 Rows not loaded because all WHEN clauses were failed. 0 Rows not loaded because all fields were null. Space allocated for bind array: 115584 bytes(64 rows) Read buffer bytes: 1048576 Total logical records skipped: 0 Total logical records read: 5 Total logical records rejected: 0 Total logical records discarded: 0 Run began on Mon Dec 05 16:16:29 2005 Run ended on Mon Dec 05 16:16:42 2005 Elapsed time was: 00:00:12.22 CPU time was: 00:00:00.09You can now work with the
dependentstable, as you would any other table.
Exporting and Importing Data
Oracle Database XE provides the following command-line utilities for exporting and importing data:
-
Data Pump Export and Data Pump Import
-
Export and Import
The following sections provide an overview of each utility. For a summary of when you might want to use each utility, see Table 10-2.
-
Exporting and Importing with Data Pump Export and Data Pump Import
-
Exporting and Importing Data with the Export and Import Utilities
See Also:
Oracle Database Utilities for detailed information on these utilities, including command line parameter descriptions and additional examples.
Exporting and Importing with Data Pump Export and Data Pump Import
The Data Pump Export utility exports data and metadata into a set of operating system files called a dump file set. The Data Pump Import utility imports an export dump file set into a target Oracle database.
A dump file set is made up of one or more disk files that contain table data, database object metadata, and control information. The files are written in a proprietary, binary format, which means that the dump file set can be imported only by the Data Pump Import utility. The dump file set can be imported to the same database or it can be moved to another system and loaded into the Oracle database there.
Because the dump files are written by the database, rather than by the Data Pump client application, you must create directory objects for the directories to which files will be written. A directory object is a database object that is an alias for a directory in the host operating system's file system.
Data Pump Export and Import enable you to move a subset of the data and metadata. This is done by using Data Pump parameters to specify export and import modes, as well as various filtering criteria.
You can also perform exports and imports over a network. In a network export, the data from the source database instance is written to a dump file set on the connected database instance. In a network import, a target database is loaded directly from a source database with no intervening dump files. This allows export and import operations to run concurrently, minimizing total elapsed time.
Data Pump Export and Import also provide a set of interactive commands so that you can monitor and modify ongoing export and import jobs.
Note:
Data Pump Export and Data Pump Import do not support XMLType data. If you need to export and import XMLType data, use the Export and Import options described in "Exporting and Importing Data with the Export and Import Utilities".
Example: Using Data Pump Export and Data Pump Import
In this example, suppose that you want to make some changes to the HR sample schema and then test those changes without affecting the current HR schema. You could export the HR schema and then import it into a new HRDEV schema, where you could perform development work and conduct testing. To do this, take the following steps:
-
Do one of the following:
-
On Windows: Log in to the Oracle Database XE host computer as the user who installed Oracle Database XE, and then open a command window.
-
On Linux: Start a terminal session and log in to the Oracle Database XE host computer with the
oracleuser account.
-
-
On Linux, ensure that environment variables are set according to the instructions in "Setting Environment Variables on the Linux Platform".
-
At the command prompt, issue the command appropriate to your operating system, to create the directory where the exported files will be placed:
On Windows:
MKDIR c:\oraclexe\app\tmp
On Linux:
mkdir /usr/lib/oracle/xe/tmp
-
Start the SQL Command Line (SQL*Plus) and connect as user
SYSTEMby entering the following at the command prompt:sqlplus SYSTEM/passwordwhere
passwordis the password that you specified for theSYSandSYSTEMuser accounts upon installation (Windows) or configuration (Linux) of Oracle Database XE. -
At the SQL prompt, enter the following commands to create a directory object named
dmpdirfor thetmpdirectory that you just created, and to grant read and write access to it for userHR.On Windows:
CREATE OR REPLACE DIRECTORY dmpdir AS 'c:\oraclexe\app\tmp'; GRANT READ,WRITE ON DIRECTORY dmpdir TO hr;
On Linux:
CREATE OR REPLACE DIRECTORY dmpdir AS '/usr/lib/oracle/xe/tmp'; GRANT READ,WRITE ON DIRECTORY dmpdir TO hr;
-
Export the
HRschema to a dump file namedschema.dmpby issuing the following command at the system command prompt:expdp SYSTEM/password SCHEMAS=hr DIRECTORY=dmpdir DUMPFILE=schema.dmp LOGFILE=expschema.logwhere
passwordis the password for theSYSTEMuser.As the export operation takes place, messages similar to the following are displayed:
Connected to: Oracle Database 11g Express Edition Release 11.2.0.1.0 - Production Starting "SYSTEM"."SYS_EXPORT_SCHEMA_01": SYSTEM/******** SCHEMAS=hr DIRECTORY=dmpdir DUMPFILE=schema.dmp LOGFILE=expschema.log Estimate in progress using BLOCKS method... Processing object type SCHEMA_EXPORT/TABLE/TABLE_DATA Total estimation using BLOCKS method: 448 KB Processing object type SCHEMA_EXPORT/USER Processing object type SCHEMA_EXPORT/SYSTEM_GRANT Processing object type SCHEMA_EXPORT/ROLE_GRANT Processing object type SCHEMA_EXPORT/DEFAULT_ROLE Processing object type SCHEMA_EXPORT/TABLESPACE_QUOTA Processing object type SCHEMA_EXPORT/PRE_SCHEMA/PROCACT_SCHEMA Processing object type SCHEMA_EXPORT/SEQUENCE/SEQUENCE Processing object type SCHEMA_EXPORT/TABLE/TABLE Processing object type SCHEMA_EXPORT/TABLE/INDEX/INDEX Processing object type SCHEMA_EXPORT/TABLE/CONSTRAINT/CONSTRAINT Processing object type SCHEMA_EXPORT/TABLE/INDEX/STATISTICS/INDEX_STATISTICS Processing object type SCHEMA_EXPORT/TABLE/COMMENT Processing object type SCHEMA_EXPORT/PROCEDURE/PROCEDURE Processing object type SCHEMA_EXPORT/PROCEDURE/ALTER_PROCEDURE Processing object type SCHEMA_EXPORT/VIEW/VIEW Processing object type SCHEMA_EXPORT/TABLE/CONSTRAINT/REF_CONSTRAINT Processing object type SCHEMA_EXPORT/TABLE/TRIGGER Processing object type SCHEMA_EXPORT/TABLE/STATISTICS/TABLE_STATISTICS . . exported "HR"."COUNTRIES" 6.093 KB 25 rows . . exported "HR"."DEPARTMENTS" 6.640 KB 27 rows . . exported "HR"."EMPLOYEES" 15.77 KB 107 rows . . exported "HR"."JOBS" 6.609 KB 19 rows . . exported "HR"."JOB_HISTORY" 6.585 KB 10 rows . . exported "HR"."LOCATIONS" 7.710 KB 23 rows . . exported "HR"."REGIONS" 5.296 KB 4 rows Master table "SYSTEM"."SYS_EXPORT_SCHEMA_01" successfully loaded/unloaded ****************************************************************************** Dump file set for SYSTEM.SYS_EXPORT_SCHEMA_01 is: C:\ORACLEXE\APP\TMP\SCHEMA.DMP Job "SYSTEM"."SYS_EXPORT_SCHEMA_01" successfully completed at 11:48:46
The
schema.dmpfile and theexpschema.logfile are written to thedmpdirdirectory. -
Import the dump file,
schema.dmp, into another schema, in this case,HRDEV. You use theREMAP_SCHEMAcommand parameter to indicate that objects are to be imported into a schema other than their original schema. Because theHRDEVuser account does not already exist, the import process automatically creates it. In this example, you will import everything except constraints, ref_constraints, and indexes. If a table already exists, it is replaced with the table in the export file.At the operating system command prompt, issue the following command:
impdp SYSTEM/password SCHEMAS=hr DIRECTORY=dmpdir DUMPFILE=schema.dmp REMAP_SCHEMA=hr:hrdev EXCLUDE=constraint, ref_constraint, index TABLE_EXISTS_ACTION=replace LOGFILE=impschema.logwhere
passwordis the password for theSYSTEMuser.As the import operation takes place, messages similar to the following are displayed (this output is also written to the
impschema.logfile in thedmpdirdirectory):Connected to: Oracle Database 11g Express Edition Release 11.2.0.1.0 - Production Master table "SYSTEM"."SYS_IMPORT_SCHEMA_01" successfully loaded/unloaded Starting "SYSTEM"."SYS_IMPORT_SCHEMA_01": SYSTEM/******** SCHEMAS=hr DIRECTORY=dmpdir DUMPFILE=schema.dmp REMAP_SCHEMA=hr:hrdev EXCLUDE=constraint, ref_constraint, index TABLE_EXISTS_ACTION=replace LOGFILE=impschema.log Processing object type SCHEMA_EXPORT/USER Processing object type SCHEMA_EXPORT/SYSTEM_GRANT Processing object type SCHEMA_EXPORT/ROLE_GRANT Processing object type SCHEMA_EXPORT/DEFAULT_ROLE Processing object type SCHEMA_EXPORT/TABLESPACE_QUOTA Processing object type SCHEMA_EXPORT/PRE_SCHEMA/PROCACT_SCHEMA Processing object type SCHEMA_EXPORT/SEQUENCE/SEQUENCE Processing object type SCHEMA_EXPORT/TABLE/TABLE Processing object type SCHEMA_EXPORT/TABLE/TABLE_DATA . . imported "HRDEV"."COUNTRIES" 6.093 KB 25 rows . . imported "HRDEV"."DEPARTMENTS" 6.640 KB 27 rows . . imported "HRDEV"."EMPLOYEES" 15.77 KB 107 rows . . imported "HRDEV"."JOBS" 6.609 KB 19 rows . . imported "HRDEV"."JOB_HISTORY" 6.585 KB 10 rows . . imported "HRDEV"."LOCATIONS" 7.710 KB 23 rows . . imported "HRDEV"."REGIONS" 5.296 KB 4 rows Processing object type SCHEMA_EXPORT/TABLE/COMMENT Processing object type SCHEMA_EXPORT/PROCEDURE/PROCEDURE Processing object type SCHEMA_EXPORT/PROCEDURE/ALTER_PROCEDURE Processing object type SCHEMA_EXPORT/VIEW/VIEW Processing object type SCHEMA_EXPORT/TABLE/TRIGGER Processing object type SCHEMA_EXPORT/TABLE/STATISTICS/TABLE_STATISTICS Job "SYSTEM"."SYS_IMPORT_SCHEMA_01" successfully completed at 11:49:49
The
HRDEVschema is now populated with data from theHRschema. -
Assign a password to the newly created
HRDEVuser account. To do so, start the SQL Command Line and connect as userSYSTEM(as you did in step 4), and then at the SQL prompt, enter the followingALTERUSERstatement:ALTER USER hrdev IDENTIFIED BY hrdev;
This statement assigns the password
hrdev.You can now work in the
HRDEVschema without affecting your production data in theHRschema.
Exporting and Importing Data with the Export and Import Utilities
The Export and Import utilities provide a simple way for you to transfer data objects between Oracle databases. They are invoked with the exp and imp commands, respectively. These utilities provide support for XMLType data, whereas the Data Pump Export and Import utilities do not.
Note:
The Export and Import utilities do not support the FLOAT and DOUBLE data types. If your data contains these types and does not contain XMLType data, you must use Data Pump Export and Import, described in "Exporting and Importing with Data Pump Export and Data Pump Import".
When you run the Export utility against an Oracle database, objects (such as tables) are extracted, followed by their related objects (such as indexes, comments, and grants), if any. The extracted data is written to an export dump file. The dump file is an Oracle binary-format dump file that can be read only by the Import utility. The version of the Import utility cannot be earlier than the version of the Export utility used to create the dump file.
Note:
Dump files generated by the Export (exp) utility can only be imported by the Import (imp) utility; they cannot be imported with the Data Pump Import (impdp) utility.
Like Data Pump Import and Export, data exported with the Export utility can be imported with the Import utility into the same or a different Oracle database.
See Oracle Database Utilities for further information about the Export and Import utilities and for examples of how to use them.
Dump Oracle Database to Sql File
Source: https://docs.oracle.com/cd/E17781_01/server.112/e18804/impexp.htm
0 Response to "Dump Oracle Database to Sql File"
Post a Comment